|
Auto Draw When Auto Draw is clicked in the main menu, several options are available to draw automatically. In general, select the option needed. When you click a position at which you want to begin drawing, a window opens in which dimensions are entered. Rectangles require entry of width and height. Lines and walls require only length. However, for lines and walls, the direction in which the element is to be drawn needs to be specified. This is done by entering the size of an angle in degrees or by using the spin buttons. In either case, a line from the center of the circle indicates the direction in which the line or wall is to be drawn. You can begin drawing the cabin by drawing the outline or footprint by selecting Draw Rectangular Area under Auto Draw in the main menu. All four walls will be drawn automatically with the dimensions entered. Arrow (Cursor Control) Keys
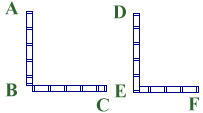
The Arrow Keys in the Number Pad move the cursor a calibrated distance as displayed in the extreme lower right of the screen as Speed. Use the Plus and Minus keys to change this distance. The separate arrow keys described above also move this distance when Shift is pressed. To use these keys, select a drawing tool and click at the position at which you want to begin drawing. (Or move to the position with the Arrow Keys.) Then hold down the appropriate key and watch the Odometers. When you get close to the length required, use individual key presses as needed. Default Plan Size The default size upon opening a new plan is 100' x 100' Several other sizes are available in the "Drawing Size Selection" window, which opens when a new plan is requested. Note there is a Minimum Cursor Movement asociated with each plan size. For best accuracy, choose the smallest size that can contain all of the finished plan; smaller cursor moves bring greater accuracy. Drawing Corners When using the wall tool to draw a rectangle such as the footprint for the cabin, work in a clockwise direction. For example, to begin you might draw a horizontal wall beginning in the upper left corner of the work space, moving from left to right. If you click again, then draw down, the corner will complete nicely. Since you generally want walls closed at corners, clockwise is the best choice. Drawing counter clockwise leaves the corners open (not drawn). The drawing below shows this difference in direction. If you draw from A down to B, then right to C (counter clockwise), the corner is not completed. But if you draw left from F to E, then up to D (clockwise), the corner is completed.
Minimum Cursor Movement This is the distance moved on a press of an arrow key within the set grouped to the right of most desktop PC keyboards. Each key press moves the cursor one pixel. The minimum distance moved is determined by the plan size selected. The smaller the size, the smaller the minimum cursor movement will be. For greater accurracy, use the smallest plan size that will contain your plan. Moving The Plan The Move Plan option is available in the Main Menu under View or by right clicking the mouse. Once selected, use the scroll bars to find the new location needed, then click. Use the Zoom Button as needed to keep track of where you are in the plan. Odometers
The odometers shown above are located in the lower left corner of the screen below the work space. When you click a drawing tool button, then click a point from which to begin drawing, distances are reset to zero. As you draw, the odometers report the distance moved. If you draw vertically or horizontally, only the associated value and length change. If you draw at an angle, then both "Horiz" and "Vert" change, and "Length" reports the actual distance moved. Zooming In And Out
|


